Introduction
The first rhubarb I ever brought home looked like celery that had been dipped in lipstick, and I treated it with the same suspicion I reserve for group texts that say “quick favor?” I chopped it way too big, tossed it with sugar, and baked it until the pan looked like a ruby tide pool. Oops. Delicious tide pool, yes, but not exactly bar-friendly. That was the night I learned two big truths about rhubarb bars: small pieces cook evenly, and a good oat crust is the dependable best friend that keeps everything together like magic.
Since then, these Rhubarb Oat Bars have become my spring ritual. I make a pan on the first warm Saturday, crack the kitchen window, and let the breeze carry the smell of brown sugar and toasty oats down the hall. The scent is cozy but bright—the dessert version of healthy comfort food. And because the recipe uses pantry staples, it slides right into weeks when I’m focused on best meal prep plans and no prep healthy lunches but still want something sweet to go with coffee. They’re snackable, shareable, and honestly kind of nostalgic, like the dessert you’d find cooling on your neighbor’s windowsill in the world’s friendliest sitcom.
What I love most is how friendly rhubarb is when you treat it well. It’s tart and feisty, but give it a hug of sugar, a squeeze of lemon, and a soft oat blanket, and it becomes jammy and mellow. The top bakes into a tender crumble that whispers when you cut into it, and the bottom crust stays just crisp enough for clean squares. It’s not a protein bar—let’s be real—but it lives happily next to whatever protein meal plan you’re tinkering with, because balance matters. These bars are simple, modest, and totally surprising, which is exactly the kind of dessert I reach for after a day of quick family meals and budget-friendly recipes.
Why You’ll Love This Recipe
- Sweet-tart magic. The rhubarb turns jammy in the oven and balances beautifully with the oat-brown sugar crumble. It’s dessert that tastes alive.
- Easy pantry win. Oats, flour, sugar, butter—plus rhubarb. That’s it. Minimal effort, major payoff.
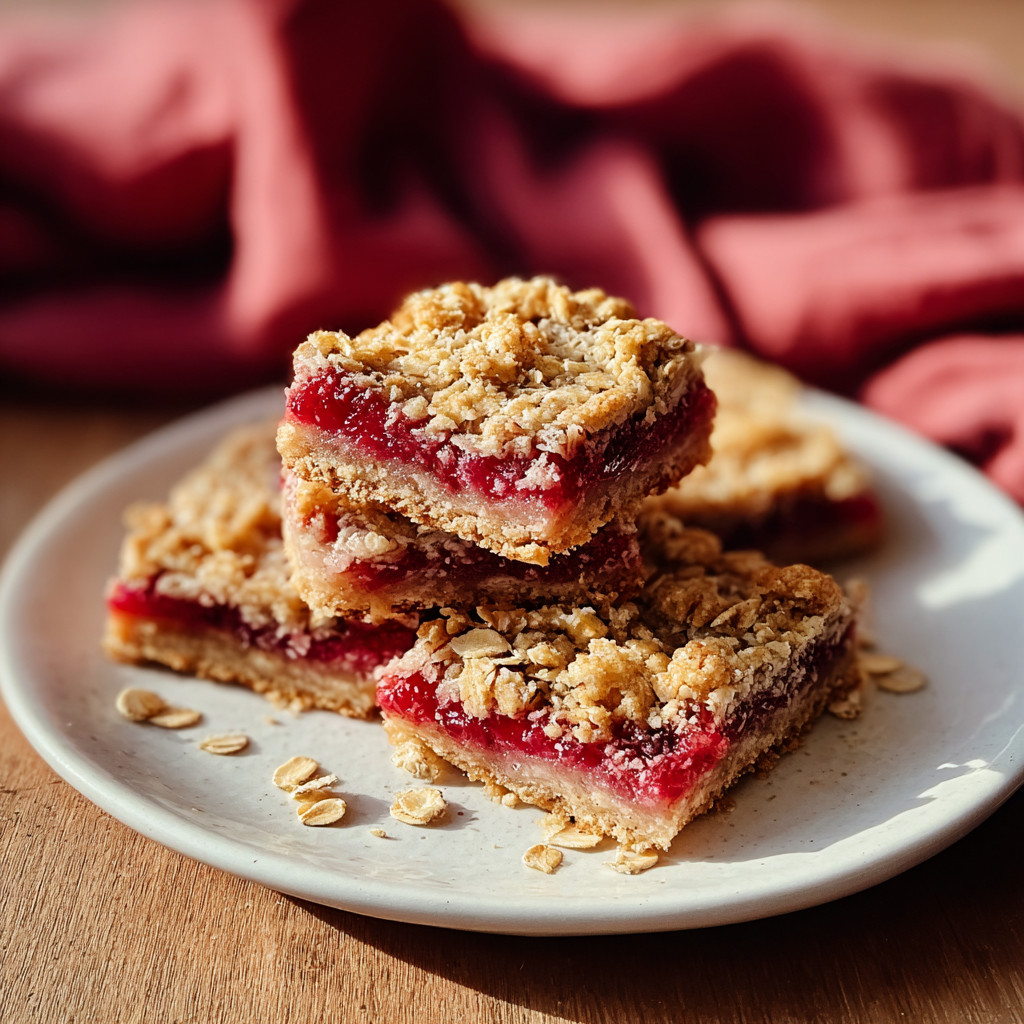
- Clean slices. The press-in crust and crumbly top make neat bars that travel well for picnics, potlucks, and teacher gifts.
- Make-ahead friendly. They actually taste better once the filling settles, which is ideal if you’re juggling good meal prep plans.
- Spring to summer flexibility. Use fresh rhubarb when markets are popping or grab frozen and keep your baking date anytime.
- Crowd-pleasing texture. Crisp edges, a chewy middle, and little pockets of soft fruit. Feels like a hug, tastes like sunshine.
What Makes This Recipe Special?
This recipe layers simplicity with smarts. The same oat mixture becomes both crust and topping, which means fewer bowls and a perfectly matched bite. A little cornstarch in the filling gives that glossy, sliceable texture without turning gluey. Lemon juice brightens the rhubarb so the flavor pops, not pouts. And because the bars cool right in the pan, the crust sets into a tidy base you can lift out in one piece—no crumbles left behind. It’s the kind of bake that rewards patience and pays off with bakery-level bar cookies while still fitting into a Sunday of high macro meals planning or a week of low calorie high nutrition meals.
Ingredients

Old-fashioned rolled oats: These are the backbone of the crust and crumble. They toast in the oven, bringing nutty flavor and that rustic chew. I prefer old-fashioned over quick oats because they keep their shape. If quick oats are all you have, they’ll work, but expect a softer, sandier top.
All-purpose flour: Helps bind the oats and creates a sturdy base that cuts cleanly. Spoon and level the flour so the crust isn’t dry. A little extra is used to dust very juicy fruit if needed.
Brown sugar: Packed brown sugar is the reason the crust tastes like a cookie. It adds molasses warmth and helps everything caramelize. Light brown sugar keeps things mellow; use dark brown for a deeper, toffee-like note.
Baking soda or baking powder (depending on your pantry): A small amount keeps the crust from feeling heavy and encourages delicate lift. If you only have baking powder, it still works—these bars are forgiving.
Salt: Non-negotiable. A pinch makes the buttery-sweet crumble taste vivid instead of flat.
Cinnamon (optional): Rhubarb and cinnamon are like old friends. Just a whisper adds comfort without stealing the spotlight. If you like a brighter spice profile, swap for cardamom or add a pinch of ginger.
Butter: Melted butter binds the oat mixture so it presses easily into the pan and bakes crisp at the edges. I use unsalted to control the salt level. Plant-based butter works if you’re keeping it dairy-free and halal.
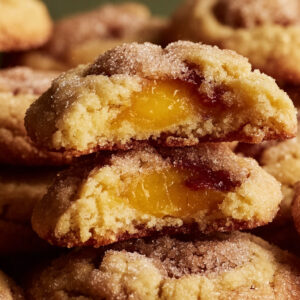
Rhubarb: The star. Fresh or frozen both work. Slice into small pieces (¼–½ inch) so they soften quickly. If using frozen, thaw and drain well to avoid soggy spots. No peeling necessary—those pink-green streaks are pretty and cook down tender.
Granulated sugar: Rhubarb needs sweetness to balance its sour personality. Adjust to taste; I keep it moderate so the fruit still sings.
Cornstarch: Thickens the juices into a glossy, sliceable filling. Flour can sub in a pinch, but cornstarch remains my favorite for a clear finish.
Lemon juice: Just a spoonful brightens everything, like turning the kitchen lights up one level.
Vanilla extract (optional): Adds bakery warmth and rounds the edges of the tartness.
Don’t do this: Don’t skip the cooling time; the bars need it to set. Don’t leave big rhubarb chunks; they’ll stay stringy. Don’t overpack the top crumble; it should be craggy, not a hard lid. And don’t forget the parchment sling—future you will thank present you when lifting out clean squares.
Brand tips: Use certified gluten-free oats if you’re baking for someone who needs it. For butter, choose a brand with simple ingredients and no fake aftertaste. For cornstarch, any basic grocery brand is fine; it’s doing quiet, reliable work here.
How to Make It Step-by-Step
1) Prep the pan and preheat. Heat your oven to 350°F. Line an 8-inch square pan with parchment, leaving an overhang on two sides so you can lift the bars out later. This is your life raft for clean cuts.
2) Mix the dry base. In a big bowl, stir together rolled oats, flour, brown sugar, baking soda, salt, and a pinch of cinnamon. You’ll see flecks of oat and brown-sugar sparkle. It should feel sandy but cohesive.
3) Add butter love. Pour in melted butter and stir until all the dry bits are moistened. The mixture should clump when you squeeze it. If it’s dusty, add a teaspoon more melted butter. I learned that the hard way when my first crust crumbled like a nature valley bar on a windy day.
4) Reserve and press. Scoop about one cup of this mixture into a small bowl for the topping. Press the rest firmly into the pan. Use the bottom of a measuring cup to get an even layer and squared corners. Pressing firmly keeps the base from cracking when you slice.
5) Make the fruit filling. In another bowl, toss chopped rhubarb with granulated sugar, cornstarch, and lemon juice. If your rhubarb looks extra juicy, let it sit for five minutes and stir again so the cornstarch hydrates. The pieces should be glistening, slightly syrupy, and smelling like a spring garden decided to bake.
6) Optional vanilla glow. Stir in a little vanilla if you want bakery warmth. It’s subtle but lovely, like background music in a diner where the pie is always fresh.
7) Layer it up. Spread the rhubarb mixture evenly over the pressed crust. Don’t worry if you see a little liquid—that’s normal. Sprinkle the reserved oat mixture over the top, pinching some into bigger crumbles for texture. You want a mix of pebbles and sand.
8) Bake until golden and bubbly. Slide the pan into the oven and bake 30–35 minutes. You’re looking for a golden top and a bit of bubbling at the edges where the fruit juices peek through. The first time I baked these I pulled the pan too early and the center was shy. Back in it went for five more minutes, and the difference was everything.
9) The hardest step: cool. Set the pan on a rack and walk away. Truly. Give it at least an hour so the filling sets and the base firms up. This is when the magic happens. Cutting too early gives you delicious rubble, which isn’t a tragedy, but we’re going for pretty bars here.
10) Lift and slice. Use the parchment to lift the whole slab out onto a board. Trim the very edges if you want bakery-clean sides (snack on the trimmings, obviously). Use a sharp knife to cut into 12 or 16 squares, wiping the knife between cuts.
11) Serve as you wish. Warm with a scoop of vanilla yogurt for breakfast, or chilled for a tidy dessert. The texture settles beautifully by day two, which makes these perfect for lunches when you’re planning premade lunch meals or no prep healthy lunches with a treat on the side.
Throughout, listen for small cues. The oat top will feel sandy before baking and pleasantly crisp afterward. The filling turns glossy and smells like lemonade collided with a bakery. The edges brown first; the middle will look softer, but it firms as it cools. If your kitchen is warm or you’re racing to a picnic, tuck the pan in the fridge for 20 minutes to speed up the set.
Tips for Best Results
- Cut the rhubarb small. Bite-size pieces cook evenly and give jammy pockets, not stringy strands.
- Don’t skimp on the press. Firm pressure on the base keeps it from crumbling when sliced.
- Let the filling rest 5 minutes before layering. The cornstarch hydrates and thickens more evenly.
- Bake to bubbles. A golden top and a little bubbling at the edges are your doneness clues.
- Cool completely. The set is everything—use the fridge if you’re in a hurry.
- For cleaner cuts, chill 30 minutes before slicing and wipe the knife between passes.
Ingredient Substitutions & Variations
- Gluten-free: Use certified gluten-free oats and a cup-for-cup gluten-free flour blend. Let the base mixture rest 5–10 minutes so the oats hydrate slightly before pressing.
- Vegan: Swap butter for a plant-based butter with at least 75–80% fat. Everything remains halal and still bakes beautifully.
- Less sweet: Reduce the brown sugar in the crust by 2 tablespoons and the granulated sugar in the filling by 1 tablespoon. The bars will lean tangier.
- Strawberry-rhubarb: Replace one-third of the rhubarb with diced strawberries for a rounder, sweeter flavor. This combo is picnic gold and pairs well with best vegan meal prep lunches.
- Warm spices: Add ¼ teaspoon ground ginger or cardamom with the cinnamon for an aromatic twist.
- Nutty crunch: Fold ½ cup chopped walnuts or almonds into the topping for texture and toasty flavor.
Serving Suggestions
Serve squares at room temperature when the topping is tender and the filling tastes bright. For brunch, pair a bar with a bowl of Greek yogurt and fresh berries—it makes a sweet side next to your omelet or a turkey-sausage version of a full english breakfast plate. After easy weeknight dinners, I like one bar slightly warmed with a splash of cold milk. For a picnic, pack chilled bars so they hold their shape in the basket. Dessert board night? Add these next to nuts, cheese, and grapes for a sweet-tart accent that keeps the board from feeling heavy.
Pairing Ideas (Drinks, Sides, etc.)
- Drinks: Iced black tea with lemon, chamomile, or a light roast coffee with caramel notes. Sparkling water with a squeeze of orange is a sleeper hit.
- Sides: Fresh strawberries, sliced oranges, or a dollop of vanilla yogurt. If you’re entertaining, a small scoop of vanilla bean ice cream turns a bar into a rustic plated dessert.
- Brunch spread: Serve alongside egg bakes, turkey sausages, and a green salad with citrus. It tucks neatly into healthy eating for two or larger family gatherings.
How to Store and Reheat Leftovers
Cool the bars completely, then store in an airtight container at room temperature for up to 3 days. If your kitchen runs warm, refrigerate and they’ll keep a couple of extra days. For the crispiest top after day two, pop a square on a baking sheet and warm in a 300°F oven for 5–7 minutes. You can microwave a bar for 10–12 seconds for soft and cozy vibes, but the oven brings back a touch of crisp. Keep fruit-packed lunches separate if you’re doing meal prep microwave lunches so extra moisture doesn’t sneak into the bars.
Make-Ahead and Freezer Tips
Bake a day ahead; the flavor deepens and the slices sharpen. If you want to freeze, chill the baked slab until firm, then wrap tightly and freeze up to 3 months. Thaw in the fridge overnight and refresh in a 300°F oven for 6–8 minutes before serving. I don’t recommend freezing unbaked filling because rhubarb releases more liquid as it thaws. Whole-pan freezing works better than individual slices for texture, but both are fine in a pinch.
Common Mistakes to Avoid
- Large rhubarb pieces: They cook unevenly and can be stringy. Aim for small dice.
- Skipping parchment: You’ll wrestle the bars out of the pan and resent past you. Make the sling.
- Underbaking: The top should be golden and the edges slightly bubbly. Beige top equals soupy center.
- Cutting too soon: Warm bars fall apart. Cool completely, then slice.
- Too much topping pressure: Sprinkle the crumble lightly. Packing it down turns it dense.
Frequently Asked Questions (FAQ)
Can I use frozen rhubarb?
Yes. Thaw and drain well, then pat dry to remove excess moisture. Measure after thawing for accuracy.
Do I need to peel rhubarb?
Nope. Trim the ends, wash, and chop. The skin softens in the oven and adds color.
Can I use quick oats?
Yes, but the texture will be softer and a bit less nubby. Old-fashioned oats give the best chew.
How do I know when it’s done?
Look for a golden top and bubbling at the edges. If the center looks pale and dull, give it 3–5 more minutes.
Can I double the recipe?
Absolutely. Use a 9×13 pan and add a few minutes to the bake time. Rotate the pan halfway for even color.
Cooking Tools You’ll Need
- 8-inch square metal or glass baking pan
- Parchment paper for an overhang sling
- Large mixing bowl and medium mixing bowl
- Measuring cups and spoons
- Sturdy spoon or spatula
- Citrus juicer (or a fork) for the lemon
- Sharp knife and cutting board
- Cooling rack for even airflow
- Offset spatula for lifting slices (optional but helpful)
Final Thoughts
There’s something wonderfully honest about rhubarb. It shows up tart and a little wild, and with a handful of oats and a pat of butter, it turns into a dessert that feels both simple and special. These Rhubarb Oat Bars are exactly that—no drama, just a humble pan of joy that slices into tidy squares and brightens any day. They’re the sweet exhale at the end of best dinner prep meals, the treat that fits next to your protein eating plan without asking for a spreadsheet, and the snack you’ll reach for when the afternoon slump hits.
Bake them for the first picnic of the season, for neighbors who brought your mail in, or for yourself on a Tuesday that needs a win. Share the corners, hoard the middle pieces, and definitely save one for breakfast. If you enjoyed this recipe, don’t forget to save it on Pinterest or share it with a friend!
P.S. If you’re planning a week of best meal prep healthy ideas, these bars tuck nicely into snack boxes and make smart companions to high carb high protein low fat meals or a light salad night. Dessert doesn’t need to fight your plans—it can quietly support them, one crumbly square at a time.

Rhubarb Oat Bars
Ingredients
- 1 1/2 cups old-fashioned rolled oats
- 1 cup all-purpose flour
- 1/2 cup brown sugar, packed
- 1/2 teaspoon baking soda
- 1/2 teaspoon salt
- 1/2 teaspoon ground cinnamon
- 1/2 cup unsalted butter, melted
- 1 1/2 cups rhubarb, diced (about 8 oz / 225 g)
- 1/4 cup granulated sugar
- 1 tablespoon cornstarch
- 1 teaspoon vanilla extract
Instructions
- Preheat oven to 350°F (175°C). Line an 8×8-inch baking pan with parchment paper, leaving an overhang for lifting.
- In a large bowl, mix oats, flour, brown sugar, baking soda, salt, and cinnamon until evenly combined.
- Stir in melted butter until the mixture is moistened and crumbly; it should hold together when pressed.
- Reserve about 1 cup of the oat mixture for topping. Press the remaining mixture firmly and evenly into the prepared pan to form the crust.
- In a separate bowl, toss diced rhubarb with granulated sugar, cornstarch, and vanilla until the fruit is evenly coated.
- Spread the rhubarb mixture evenly over the crust.
- Crumble the reserved oat mixture evenly over the rhubarb layer.
- Bake for 30–35 minutes, or until the top is golden and the filling is bubbling at the edges.
- Cool completely in the pan on a wire rack (about 1 hour), then lift out using the parchment overhang and cut into 12 bars.