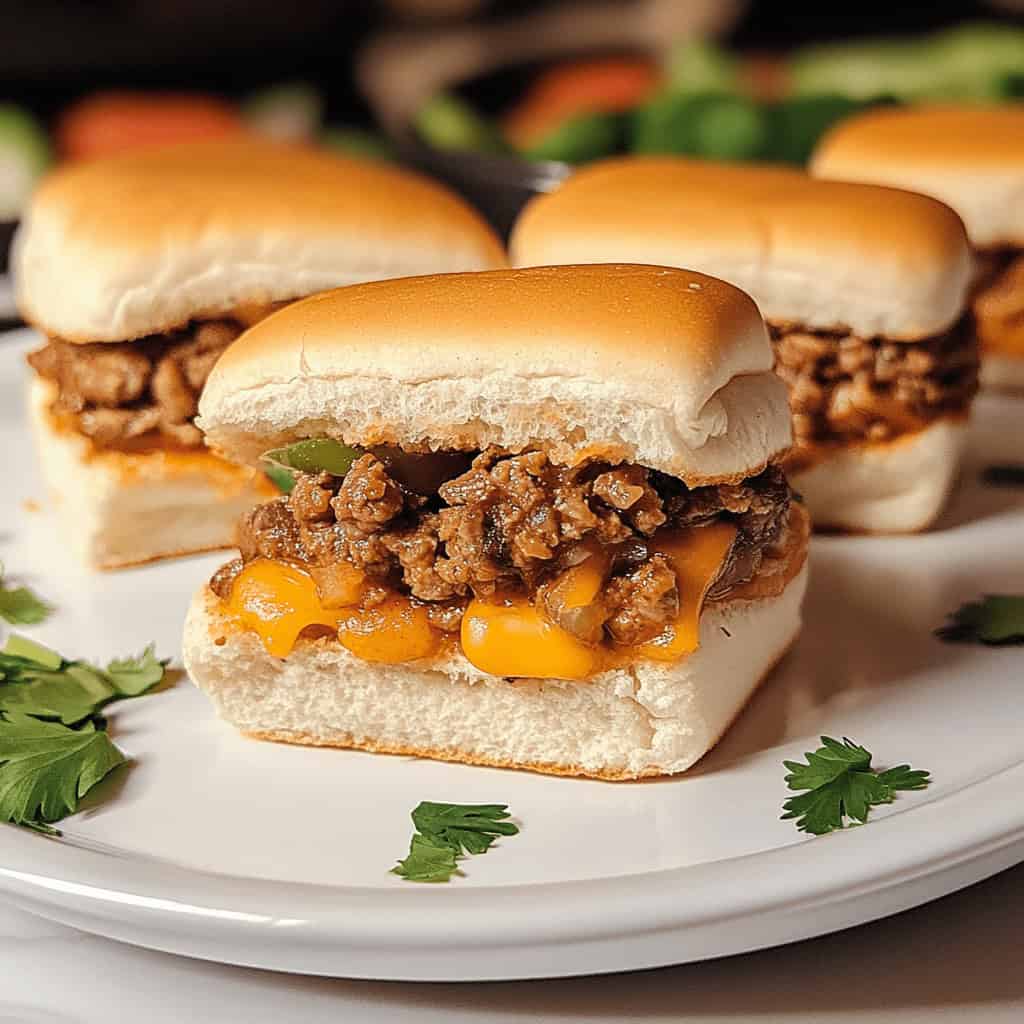
Taco sliders are the ultimate fusion of two beloved classics—hearty tacos and satisfying sliders. These mini sandwiches are a flavor-packed, bite-sized take on traditional tacos, delivering everything you love about taco night in a convenient, handheld form. Perfectly seasoned ground beef, gooey melted cheese, and your choice of fresh toppings are layered onto soft slider buns and baked until golden. Whether you’re planning a fun family dinner, prepping for game day, or entertaining a crowd, these taco sliders are sure to be a standout favorite.
Why These Taco Sliders Are a Must-Try
There’s a reason taco sliders have become a go-to party dish and weeknight dinner solution. Not only are they easy to make, but they also offer loads of customization and flavor with minimal cleanup.
- Fast and simple – With just a few ingredients and one pan, these sliders come together quickly, making them perfect for busy evenings.
- Great for gatherings – Whether you’re feeding a large group or making snacks for a party, these sliders are a hit every time.
- Fully customizable – From mild to spicy and meaty to vegetarian, you can tailor each batch to suit any preference.
- Kid-approved – Their small size and cheesy goodness make them a hit with picky eaters.
- One-dish cleanup – Everything bakes together in a single pan, making post-dinner cleanup a breeze.
With these perks, it’s no wonder taco sliders are taking center stage at gatherings and family dinners alike.
Ingredients
(Tip: You’ll find the full list of ingredients and measurements in the recipe card below.)
To make the perfect batch of taco sliders, gather the following ingredients:
- Olive oil – Used for sautéing the onions and browning the meat.
- Ground beef – Go for 85–90% lean beef for the best texture and flavor.
- Finely diced onion – Adds a subtle sweetness and depth to the meat mixture.
- Taco seasoning – Either store-bought or homemade, this brings bold, smoky, and spicy notes to the filling.
- Tomato sauce – Helps bind the taco meat and keeps it moist.
- Slider buns – Choose soft, savory rolls that hold up well when baked.
- Shredded Colby Jack or Mexican blend cheese – Melts beautifully and adds creamy richness.
- Melted butter – Brushed over the buns for golden tops.
- Garlic powder – Infuses extra flavor into the butter topping.
- Onion powder – Enhances the savory notes of the dish.
- Salt – A dash in the butter mix for balance.
- Fresh cilantro – Chopped and sprinkled on top for a pop of freshness.
Optional Toppings:
- Shredded lettuce
- Sour cream
- Salsa or pico de gallo
- Guacamole
- Sliced jalapeños
These extras let you take your taco sliders to the next level with a build-your-own flair.
Instructions: Step-by-Step Directions
- Preheat your oven to 375°F (190°C) to get it ready while you prepare the sliders.
- In a large skillet, heat olive oil over medium heat. Add the diced onion and cook for around 3 minutes, or until softened and fragrant.
- Add the ground beef to the skillet, breaking it apart with a spatula as it cooks. Cook until browned and fully cooked through, then drain any excess grease to avoid soggy sliders.
- Stir in taco seasoning and tomato sauce, allowing the mixture to simmer for 5–7 minutes until thickened and well combined.
- While the meat simmers, slice your slider buns horizontally, keeping the tops and bottoms connected as single sheets for easier handling.
- Lightly grease a 9×13-inch baking dish and place the bottom halves of the slider buns inside.
- Toast the buns in the oven for about 5 minutes—this helps prevent them from becoming soggy once the meat and cheese are added.
- Once toasted, spread half of the shredded cheese over the bottom buns.
- Evenly distribute the taco meat mixture on top of the cheese layer.
- Sprinkle the remaining cheese over the meat, then place the top halves of the buns on top to complete the sliders.
- In a small bowl, mix melted butter with garlic powder, onion powder, and a pinch of salt. Brush this mixture generously over the top of the buns.
- Cover the baking dish with foil and bake for 10 minutes.
- Remove the foil and bake for an additional 5–7 minutes or until the tops are golden brown and the cheese is fully melted.
- Garnish with chopped cilantro, and serve warm with your favorite toppings on the side.
Servings and Timing
- Yield: 12 sliders (serves approximately 6 people)
- Prep Time: 10 minutes
- Cook Time: 25 minutes
- Total Time: 35 minutes
These taco sliders are the ultimate combination of ease and flavor, ready in under 40 minutes from start to finish.
Creative Variations to Try
Want to put your own spin on this dish? Here are some tasty and creative variations:
- Use different proteins – Swap ground beef for ground turkey, shredded chicken, or plant-based meat alternatives for a lighter or vegetarian option.
- Add a spicy kick – Stir diced jalapeños or a splash of hot sauce into the taco meat for extra heat.
- Cheese swaps – Experiment with pepper jack, cheddar, Monterey Jack, or even a queso blend for variety.
- Tex-Mex twist – Add a layer of refried beans or nacho cheese sauce to the bottom buns for extra creaminess.
- Make it vegetarian – Replace the beef with sautéed mushrooms, lentils, or a hearty black bean mash.
These variations ensure you’ll never get bored with taco sliders and can tailor the recipe to different dietary needs or flavor preferences.
Storage and Reheating Tips
Taco sliders also make great leftovers! Here’s how to store and reheat them properly:
Storage:
Store leftover sliders in an airtight container in the refrigerator. They’ll stay fresh for up to 3 days.
Reheating:
To reheat, wrap the sliders in foil and warm them in a 350°F oven for 10–12 minutes. For a quicker method, microwave individual sliders for 30–45 seconds until heated through.
Note: While these sliders taste best fresh, they can still be enjoyed as leftovers if stored and reheated correctly.
Taco Sliders
Ingredients
- 1 tablespoon olive oil
- 1 pound ground beef (85–90% lean)
- 1 medium onion, finely diced
- 1 packet taco seasoning
- 1 cup tomato sauce
- 12 pieces slider buns, sliced in half
- 2 cups shredded Colby Jack or Mexican blend cheese
- 3 tablespoons melted butter
- 1 teaspoon garlic powder
- 1 teaspoon onion powder
- 1/4 teaspoon salt
- 2 tablespoons fresh cilantro, chopped
Instructions
- Preheat oven to 375°F (190°C).
- In a skillet, heat olive oil over medium heat. Add diced onion and sauté for 3 minutes.
- Add ground beef and cook until browned. Drain excess grease.
- Stir in taco seasoning and tomato sauce. Simmer for 5–7 minutes until thickened.
- Slice slider buns in half horizontally, keeping tops and bottoms together.
- Place bottom halves in a greased 9×13-inch baking dish and toast in the oven for 5 minutes.
- Sprinkle half of the shredded cheese over the toasted bottom buns.
- Spread taco meat evenly over the cheese layer.
- Top the meat with remaining cheese, then place the top halves of the buns on top.
- Mix melted butter with garlic powder, onion powder, and salt. Brush over the tops of the buns.
- Cover with foil and bake for 10 minutes.
- Remove foil and bake another 5–7 minutes until tops are golden and cheese is melted.
- Sprinkle with chopped cilantro and serve hot with optional toppings on the side.
Nutrition
Frequently Asked Questions
How can I keep the buns from turning soggy?
Lightly toasting the bottom buns before adding the meat and cheese helps keep them crisp. Also, go easy on wet toppings until after baking.
Can I assemble these ahead of time?
Absolutely! You can prepare the sliders up to a day in advance. Assemble them, cover with foil, and store in the fridge. Just bake before serving.
What’s the best meat for taco sliders?
Ground beef is the traditional choice, but ground turkey, shredded chicken, or meatless crumbles also work well depending on your preference.
Are these spicy?
That’s entirely up to you! Use mild taco seasoning for a kid-friendly version or add some heat with hot sauce or jalapeños.
Can I freeze taco sliders?
Yes, you can freeze assembled but unbaked sliders. Wrap tightly and store in the freezer for up to a month. Thaw in the refrigerator before baking.
What sides go well with taco sliders?
They pair well with Mexican rice, chips and guac, street corn salad, or a simple green salad for a balanced meal.
Can I use Hawaiian rolls instead of slider buns?
Yes, you can! Just keep in mind that Hawaiian rolls have a slightly sweet flavor, which gives the sliders a unique twist. If you prefer savory, stick with regular slider buns.
How do I keep the sliders from falling apart?
Use just enough cheese to help bind the meat and buns together. Also, avoid overloading with too many toppings.
Can I substitute shredded chicken for ground beef?
Definitely! Shredded chicken tossed with taco seasoning makes a delicious and slightly lighter version of these sliders.
Are taco sliders good for meal prep?
Yes. Portion them individually in containers and reheat as needed for quick and satisfying meals throughout the week.
Final Thoughts
Taco sliders are a fun, flavorful, and easy way to enjoy taco night with a twist. Whether you’re throwing a party, planning a casual dinner, or prepping lunch for the week, these bite-sized beauties offer bold flavor, melty cheese, and endless topping options—all in a convenient slider form. Once you try them, you’ll find yourself making them again and again for every occasion!