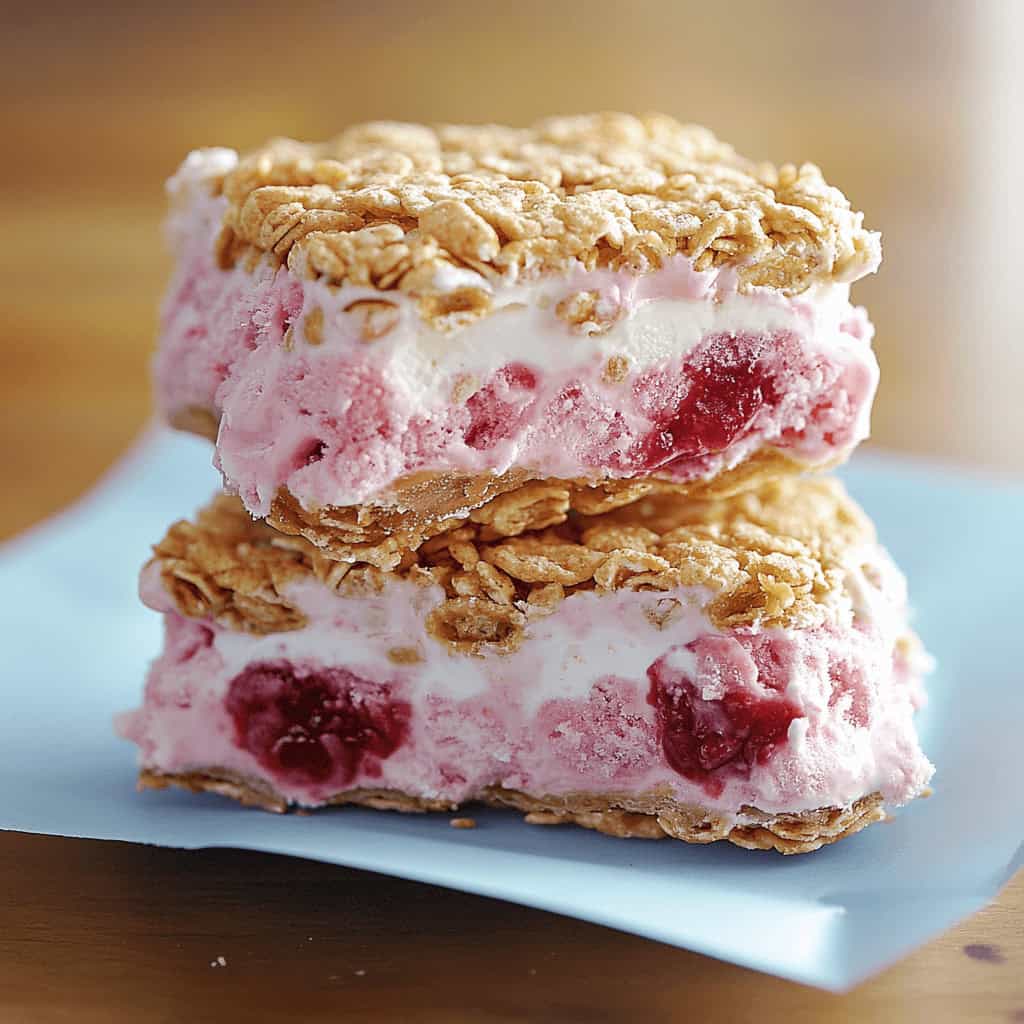
PB&J Cereal Ice Cream Sandwiches are a delightful dessert that combines the beloved flavors of peanut butter and jelly with the satisfying crunch of cereal. Perfectly sandwiched around smooth and creamy vanilla ice cream, these easy-to-make, no-bake treats are an ideal choice for warm weather or when you’re craving something both playful and sweet. Whether it’s for a summer party or a fun afternoon snack, these ice cream sandwiches are sure to please both kids and adults alike.
Why You’ll Love This Recipe
- Kid-Friendly Fun: A whimsical take on the classic PB&J that’s bound to make everyone smile.
- No-Bake Simplicity: This recipe doesn’t require an oven, making it a breeze to prepare.
- Textural Delight: A perfect balance of crunchy cereal and creamy ice cream, creating a unique mouthfeel.
- Highly Customizable: Easily swap out ingredients to suit your taste preferences.
- Great for Sharing: These sandwiches are ideal for parties, picnics, or as a fun after-school snack.
Ingredients
(Tip: You’ll find the full list of ingredients and measurements in the recipe card below.)
- Puffed rice or puffed wheat cereal
- Peanut butter (creamy or chunky)
- Honey or corn syrup
- Jelly or jam (choose your favorite flavor)
- Vanilla ice cream (softened slightly for easier spreading)
Directions
Step 1: Prepare the Cereal Mixture
Start by placing the peanut butter and honey (or corn syrup) in a large microwave-safe bowl. Heat it in the microwave for about 30 seconds, then stir the mixture until it becomes smooth and well combined. Once the peanut butter mixture is smooth, add the puffed cereal to the bowl and stir until every piece is evenly coated with the peanut butter mixture.
Step 2: Form the Sandwich Bases
Line a baking sheet with parchment paper to prevent sticking. Next, press half of the cereal mixture into an even layer on the parchment paper. Aim for a thickness of about ½ inch. Once the cereal is spread evenly, take your chosen jelly or jam and spread a thin layer on top of the cereal.
Pop the baking sheet into the freezer for about 10 minutes, allowing the layers to firm up before adding the ice cream.
Step 3: Add the Ice Cream
After the base has firmed up in the freezer, remove it and spread a layer of softened vanilla ice cream on top of the jelly layer. Try to spread the ice cream as evenly as possible for a smooth texture. Once the ice cream is spread, take the remaining cereal mixture and gently press it onto the ice cream layer, forming the top of the sandwich. Make sure to press lightly so the cereal adheres but doesn’t become too compact.
Step 4: Freeze and Cut
Place the completed sandwich base into the freezer again and allow it to freeze for at least two hours. This will help the sandwiches firm up so they’re easy to cut and serve. After the freezing period, take the sandwiches out and use a sharp knife to slice them into individual portions.
Step 5: Serve and Enjoy
You can serve these immediately or wrap each sandwich in plastic wrap for storage. If you choose to store them, they’ll last up to one week in the freezer, making them perfect for preparing in advance for a party or gathering. Simply remove from the freezer when ready to serve, and enjoy the perfect balance of creamy and crunchy.
Servings and Timing
- Servings: 8–10 sandwiches
- Prep Time: 20 minutes
- Freezing Time: 2 hours
- Total Time: Approximately 2 hours 20 minutes
Variations to Try
- Nut-Free Option: Swap peanut butter for sunflower seed butter or cookie butter to accommodate allergies.
- Different Cereals: You can change up the puffed rice by using puffed quinoa, cornflakes, or even granola for different textures and flavors.
- Flavor Twist: For a fresh twist, use strawberry, grape, or apricot jam instead of the traditional jelly.
- Chocolate Touch: Add mini chocolate chips to the cereal mixture or drizzle melted chocolate on top for an extra indulgent flavor.
- Dairy-Free: Make these sandwiches dairy-free by opting for dairy-free ice cream for a vegan-friendly dessert.
Storage and Reheating
- Storage: After wrapping each sandwich in plastic wrap or wax paper, store them in an airtight container in the freezer. They will stay fresh for up to 1 week.
- Reheating: These ice cream sandwiches are meant to be served frozen. If you’d like, you can let them soften slightly at room temperature for a few minutes before serving.
FAQs
- Can I use crunchy peanut butter instead of creamy?
Yes! Crunchy peanut butter adds a bit more texture to the mixture, making the sandwiches even more fun to eat. - What other cereals can I use?
Puffed rice or puffed wheat work best, but feel free to experiment with other cereals like cornflakes or granola for a different crunch. - Can I make these sandwiches smaller?
Absolutely! You can use a smaller baking dish and cut them into bite-sized portions for mini sandwiches. - How do I avoid the sandwiches sticking to the knife or baking sheet?
Line your baking sheet with parchment paper for easy removal. Additionally, use a sharp knife to cut clean slices. A bit of non-stick spray on your hands or spatula can help with pressing the cereal layers. - Can I use homemade jam for this recipe?
Homemade jam works wonderfully! It can add a personal touch and unique flavor to the sandwiches. - What if the cereal mixture is too sticky?
If the mixture feels too sticky, lightly grease your hands or spatula with non-stick spray. This will make it easier to press the cereal mixture into layers. - Is it possible to skip freezing the layers?
Freezing the layers helps them set properly and makes assembly easier. While it’s possible to skip this step, we highly recommend freezing for the best results. - Can I use chocolate ice cream instead of vanilla?
Absolutely! Chocolate or even peanut butter ice cream would be delicious alternatives that pair perfectly with the PB&J flavors. - How can I prevent the sandwiches from melting too quickly?
To keep them from melting too fast, serve the sandwiches straight from the freezer and work quickly when slicing and wrapping them. - Can I add any extra toppings?
Yes, you can drizzle caramel sauce or sprinkle crushed peanuts or chocolate chips on top for added texture and flavor.
Conclusion
PB&J Cereal Ice Cream Sandwiches are a delightful and nostalgic twist on a classic treat. The combination of creamy ice cream, sweet jelly, and crunchy cereal creates a flavor and texture profile that’s both fun and delicious. Whether you’re looking for a special dessert for a party or just a playful snack for the family, these ice cream sandwiches will quickly become a favorite. Enjoy them as they are or get creative with the variations for endless fun!

PB&J Cereal Ice Cream Sandwiches
Ingredients
- 4 cups puffed rice or puffed wheat cereal
- 1/2 cup peanut butter (creamy or chunky)
- 1/4 cup honey or corn syrup
- 1/2 cup jelly or jam (your favorite flavor)
- 1 quart vanilla ice cream (softened slightly)
Instructions
- In a large microwave-safe bowl, combine the peanut butter and honey (or corn syrup). Microwave for 30 seconds, then stir until smooth and well combined.
- Add the puffed cereal to the mixture and stir until fully coated.
- Line a baking sheet with parchment paper. Press half of the cereal mixture into an even layer on the baking sheet, about ½ inch thick.
- Spread a thin layer of jelly or jam over the cereal layer and freeze for 10 minutes to firm up.
- Remove the base from the freezer and spread softened vanilla ice cream evenly over the jelly layer. Top with the remaining cereal mixture, pressing gently to adhere.
- Freeze the assembled sandwiches for at least 2 hours or until firm. Slice into individual sandwich portions using a sharp knife.
- Serve immediately or wrap each sandwich individually in plastic wrap and store in the freezer for up to 1 week.